How to replace the rear brake pads on a V-Strom 650
Posted onToday we’ll change the brake pads on a V-Strom 650. This is an easy job. You don’t need special tools, nor strong manly hands. It takes about 30 minutes.
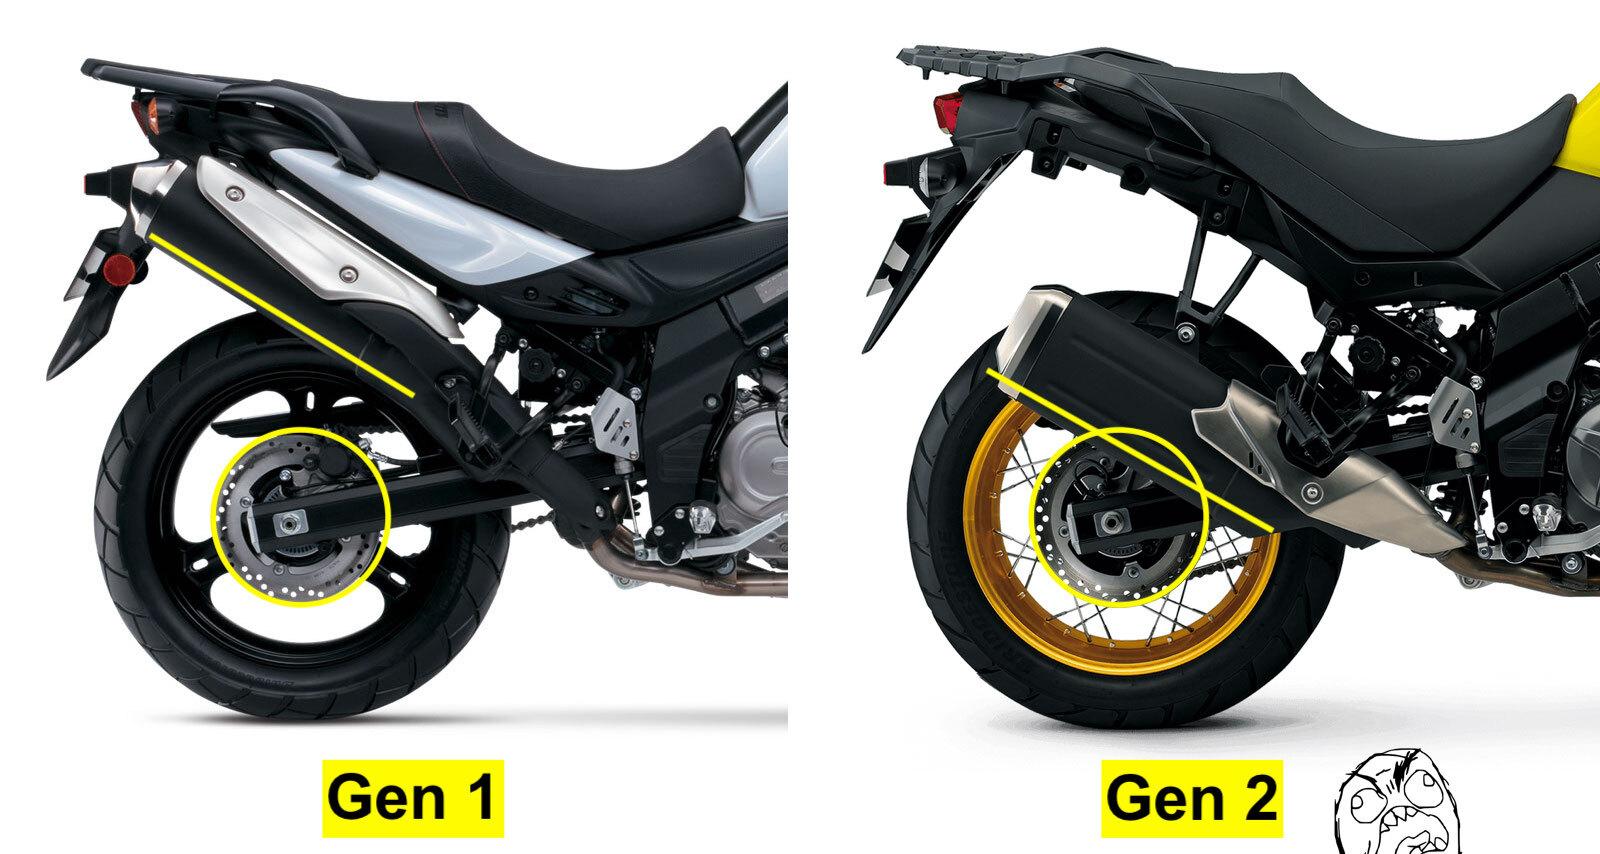
The procedure is the same on V-Strom 650 models. The calipers are the same. On second generation V-Stroms (2017+), you have to work between the muffler and the wheel, and the cramped space makes things a little harder.
Required parts
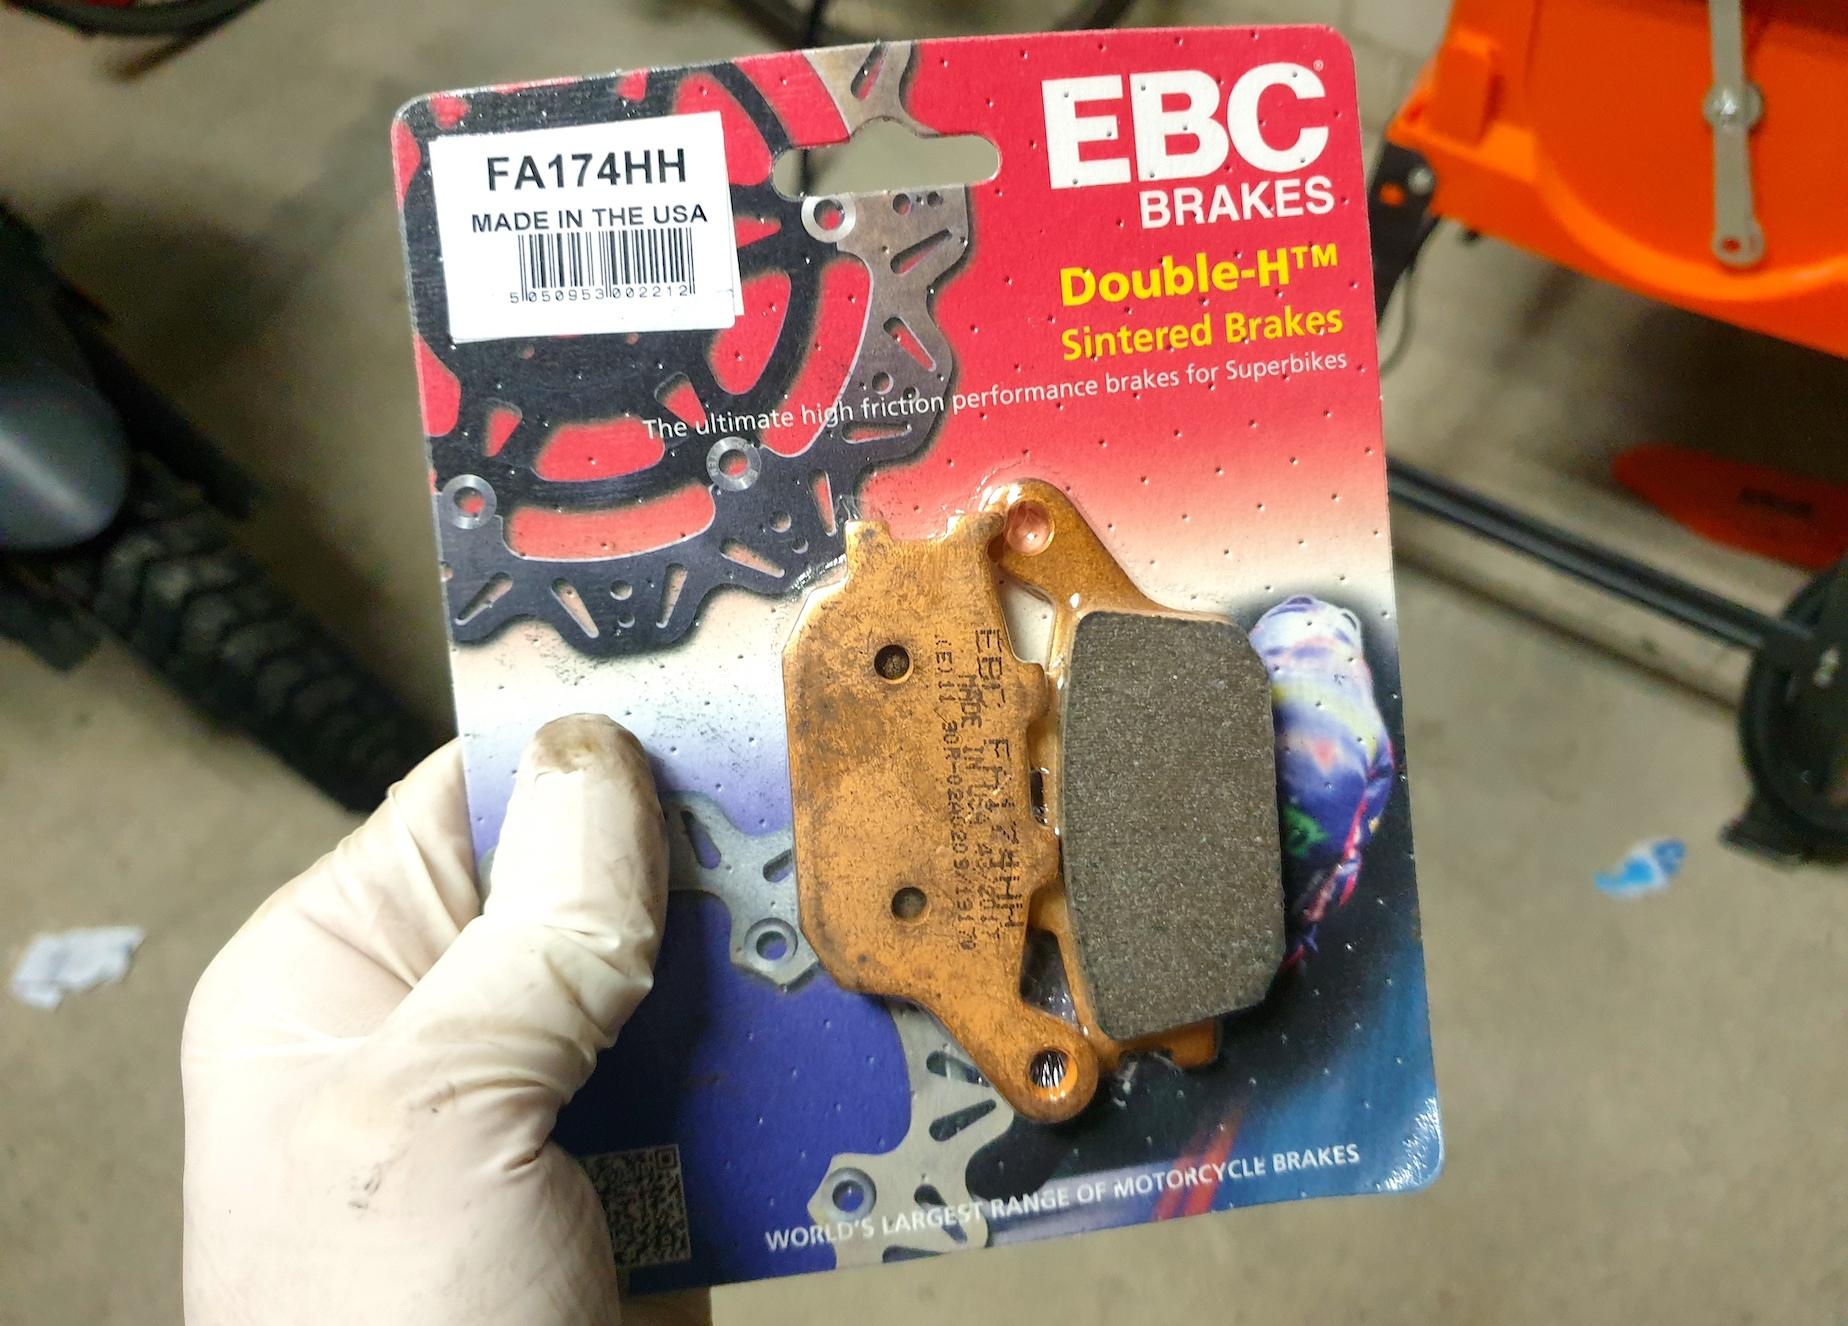
You need a new set of brake pads. The part number for the rear brake pads is 69100-068301. All V-Strom 650 models use the same brake pads. You only need one pair for the rear wheel.
You may wonder which brake pads are the best. This is the subject of a decade-long, yet-unsettled debate across multiple forums. The original Suzuki pads are well-recommended, but I went for the cheaper EBC FA174 HH.
If you’re also changing the front brake pads, keep in mind that there are two sets of pads in the front, each with a different part number.
Required tools
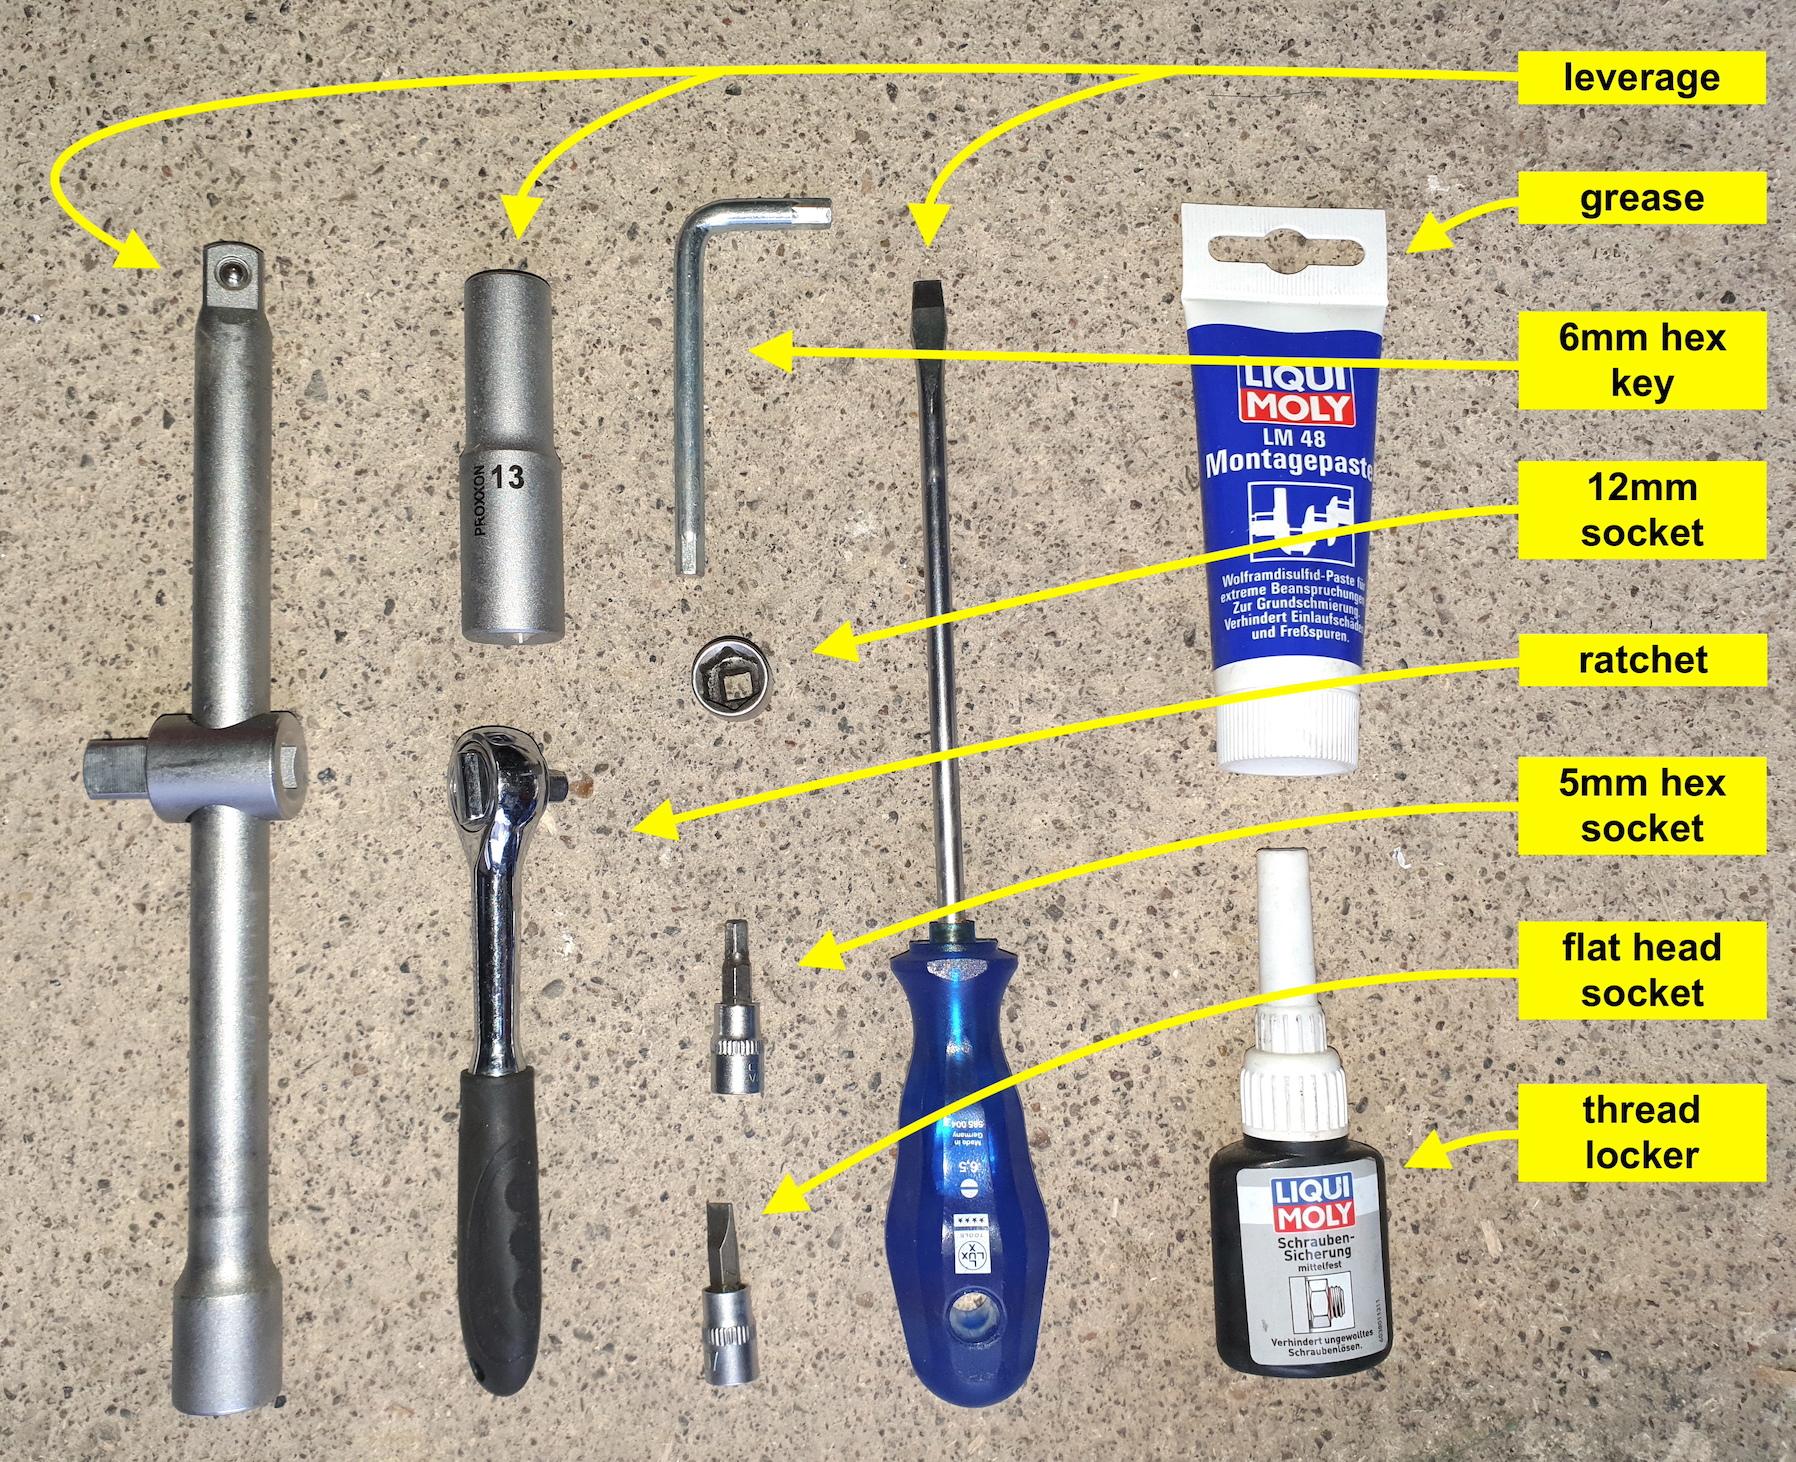
- 12 mm socket or spanner
- 6 mm hex key
On 2017+ V-Stroms, it’s too cramped to use a ratchet. There’s only about 4cm between the bolt and the muffler. - 5 mm hex key or socket
On 2017+ V-Stroms, it’s too cramped to use a screwdriver. You must use a hex key or a ratchet to work at a 90º angle. - Flat head socket
On 2017+ V-Stroms, it’s too cramped to use a screwdriver. You must use a socket to work at a 90º angle. - Leverage for the 6 mm hex key
On 2017+ V-Stroms, it’s too cramped to use a ratchet, but you won’t be able to tighten that bolt with just a hex key. You can use a metal tube to make your hex key a little longer. I used a spark plug socket at the end of a breaker bar. - Automotive grease
- Threadlocker (optional)
- Brake cleaner (optional)
Ideally, you should clean the calliper while you replace the pads.
How to change the brake pads
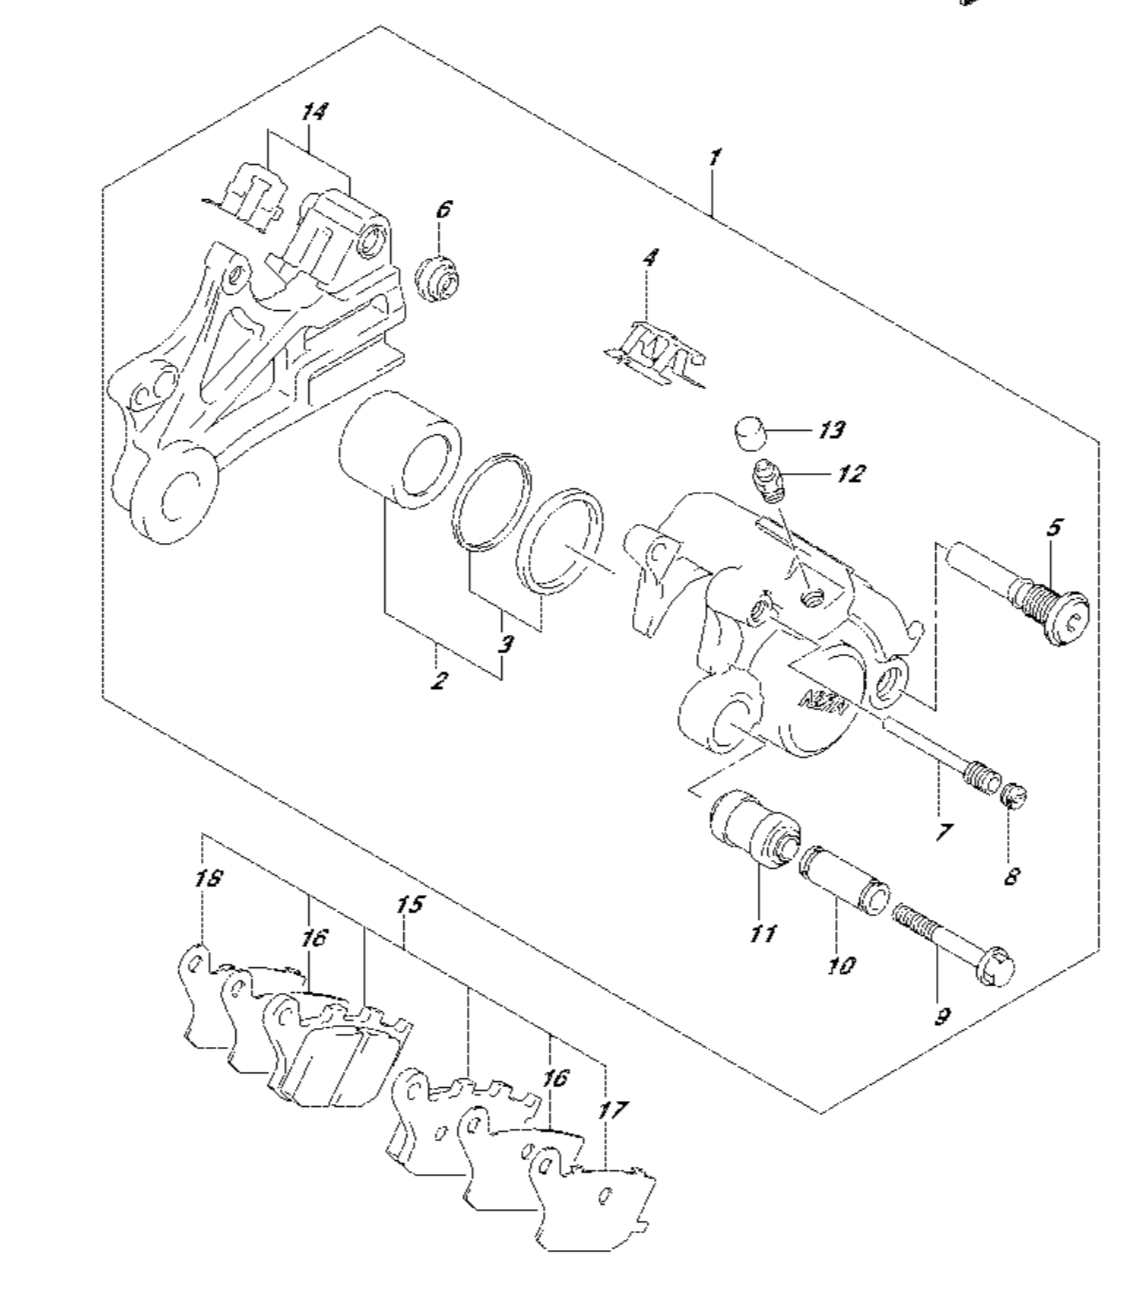
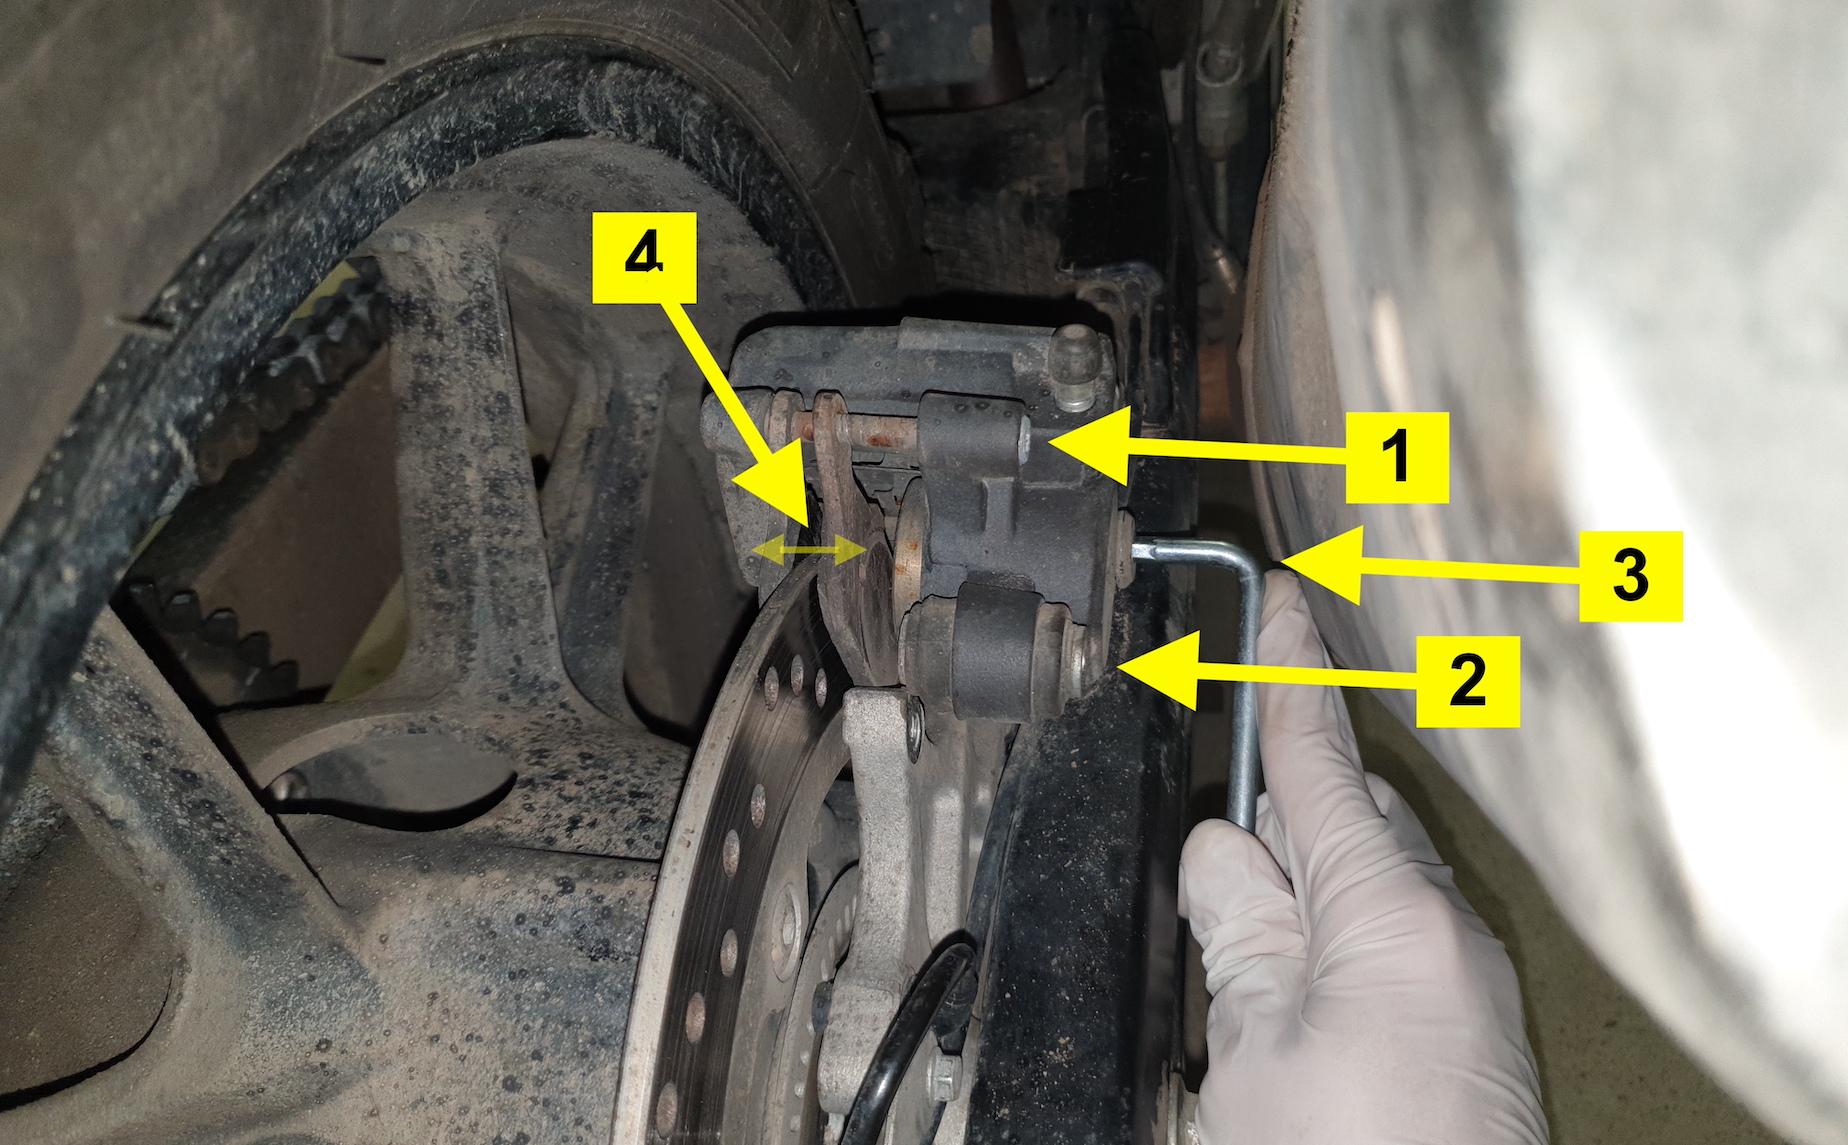
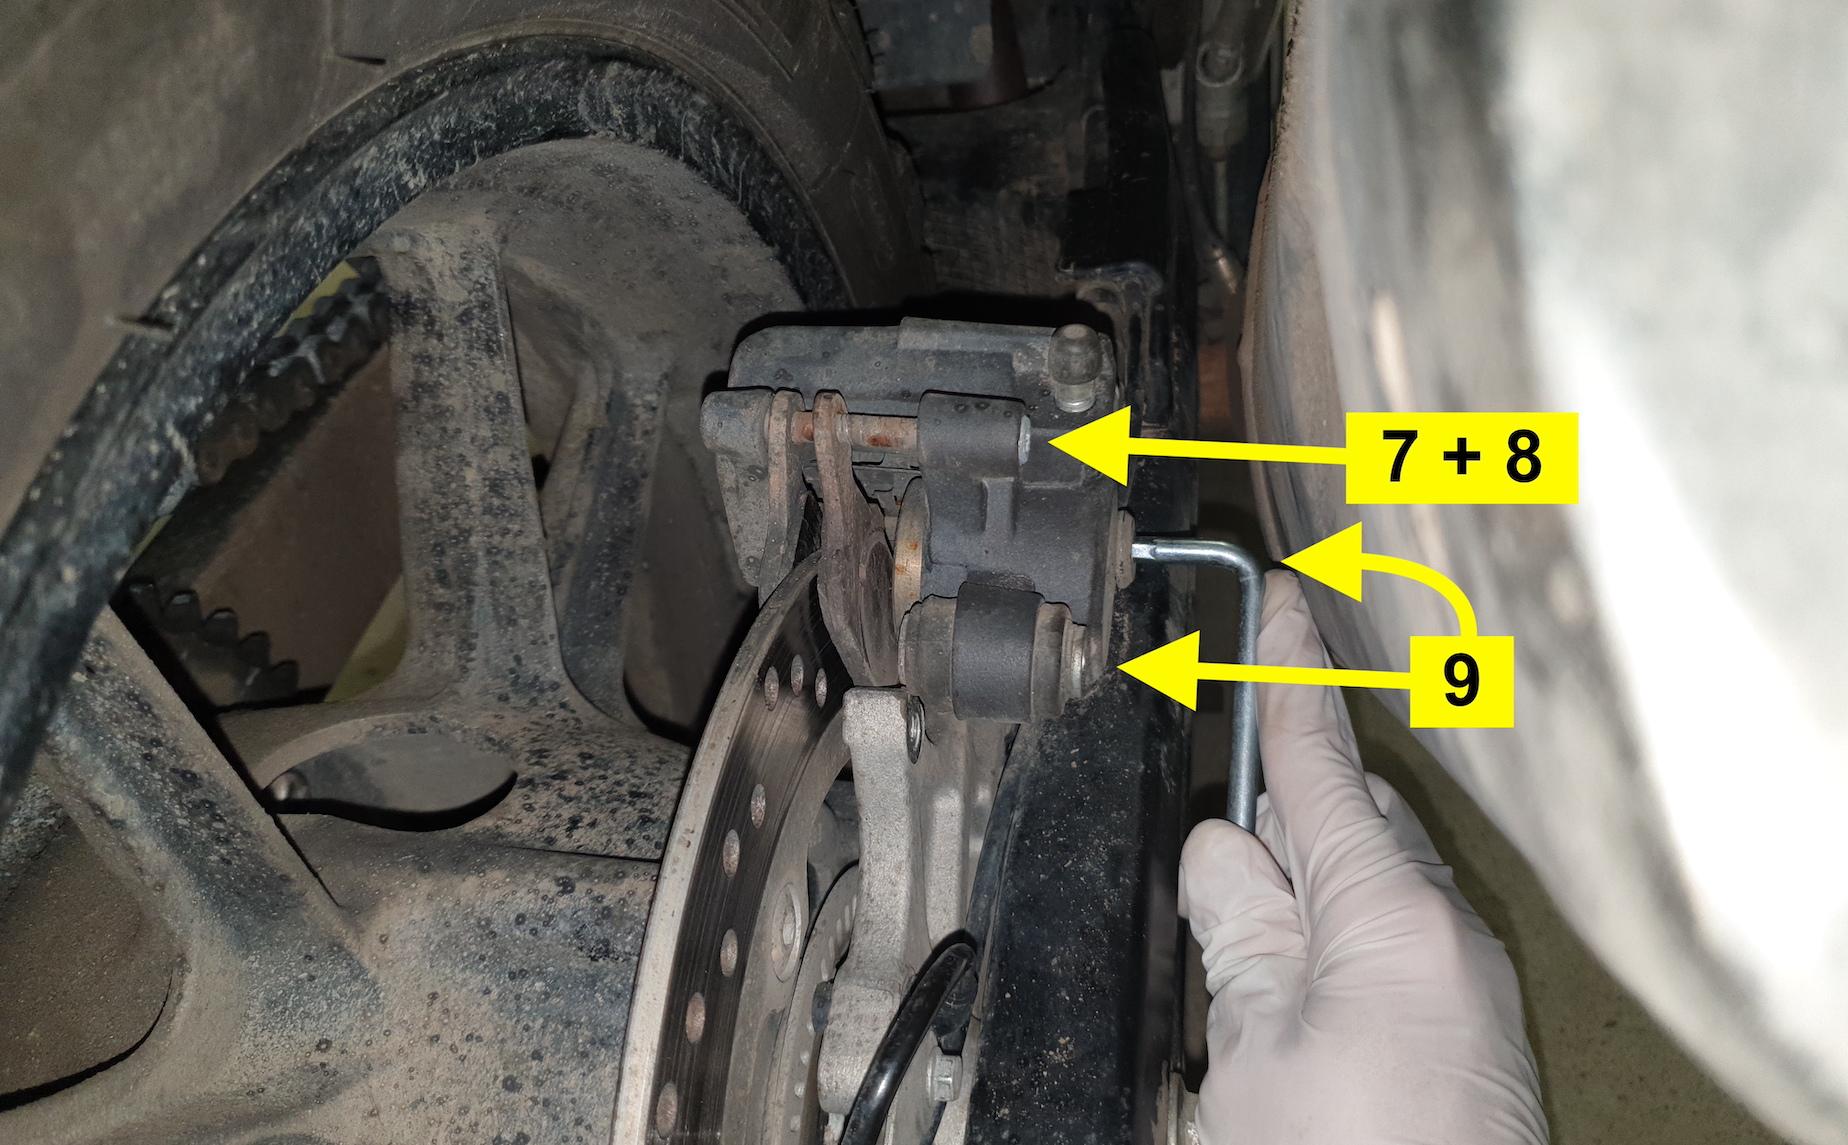
- Using the flat head socket, remove the brake pad pin plug (8). Then, use the 5 mm hex key to loosen - but do not remove - the pin under that plug (7). That pin holds the break pads in place.
- Remove the 12 mm bolt (9) that holds the caliper in place.
- Loosen - but do not remove - the 6 mm hex bolt that holds the caliper in place (5). On 2017+ V-Stroms, you won’t have much room to fit your tools. The caliper should be loose, but the bolt (5) should hold it in place.
- Lift the caliper a little, and fit a flat head screwdriver between the brake pads. Use the screwdriver to push the brake pads apart. This will push the piston back, and give you more room to fit the new, thicker brake pads. On older models, you can also push the piston back with a clamp, as shown here.
- Remove the pin that holds the brake pads (7).
- Remove the brake pads, and insert the new brake pads. Be careful not to loose the little metal springs (4 and 14). This is a good time to clean the caliper and grease the moving parts. Avoid getting any grease on the brake pads, or the brake disk.
- Grease, reinsert and tighten the pin that holds the brake pads (7). Do not get any grease on the pin’s thread. Torque the pin (7) at 17 N·m (12.5 Ib·ft)2. I chose to apply thread locker to that bolt.
- Reinsert the plug that covers the brake pad pin (8). Do not over-tighten it; it’s not holding the motorcycle together. Torque the plug at 2.5 N·m (1.8 Ib·ft)2.
- Reinsert and tighten the bolts that holds the caliper (5 and 9). Torque the 12 mm bolt (9) and the 6 mm hex bolt (5) at 22 N·m (16 Ib·ft)2. I chose to apply thread locker to the 12 mm bolt (9).
Breaking in the new pads
If you changed the brake pads, but not the brake rotors, your brakes might feel very soft. You need to break them in before they perform properly. Clean the rotor with brake cleaner, then drive to a quiet area. Drive to 60 km/h (32 knots), then brake normally to 10 km/h (I wrote “normally”; don’t slam the brakes). Repeat this a dozen times in quick succession, and you’re good to go.